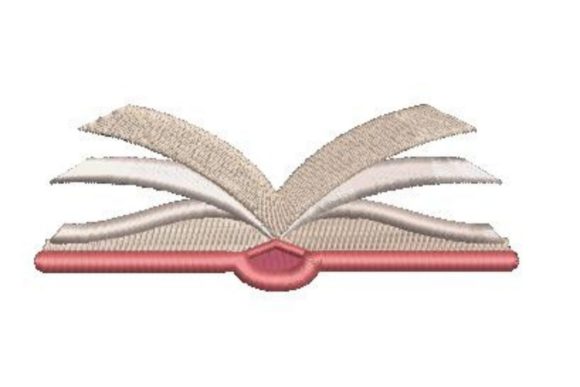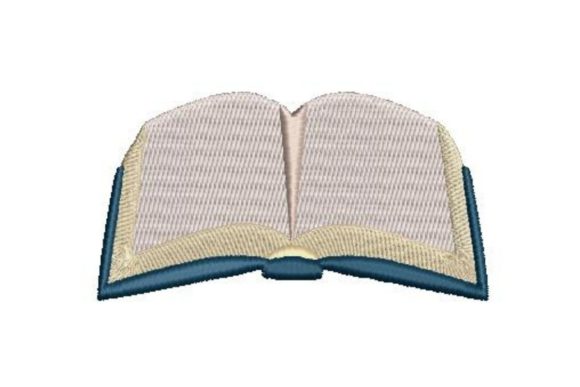
Open Book with Blank Pages: Elevating Your Embroidery Projects Beyond the Basics
The allure of a fresh start is powerful, especially in the world of creative design. An open book with blank pages serves as more than just a simple motif; it represents potential, storytelling, and personalization. For machine embroidery enthusiasts, this design offers a unique canvas to merge traditional stitching with modern customization. Whether you are looking to personalize your desk setup or create a layered decorative piece by stitching an inspirational quote directly onto the pages, this digital asset provides versatility that few other designs can match. However, leveraging this design effectively requires more than just downloading the file and hitting "start." Many creators overlook critical technical and aesthetic details, leading to results that fall short of their vision.
Understanding the Versatility of the Design
At its core, the open book design is a structural element. It provides a frame for text, making it ideal for monograms, quotes, or dates. Because the pages are blank, they invite interaction. You might use this machine embroidery design to create a personalized journal cover, a wall hanging for a home office, or even a unique gift for a teacher or writer. The fact that this specific design comes with multiple embroidery file formats means it is compatible with a wide range of machines, from entry-level home units to professional multi-needle systems. This accessibility is a major advantage, but it also leads to a common misconception: that compatibility equals automatic quality.
Many beginners assume that because a file opens in their software, it will stitch out perfectly. This is rarely the case without proper preparation. The open book with blank pages motif often involves fine lines and potentially dense fill areas depending on the size. If you do not understand how your specific machine handles these elements, you risk puckering fabric, breaking needles, or creating a messy final product that lacks the crisp elegance the design promises.
Common Mistakes That Compromise Quality
One of the most frequent errors involves ignoring the relationship between design size and stitch density. When you scale an embroidery design up or down, the stitch count does not always adjust proportionally in a way that maintains quality. If you shrink the open book design too much, the stitches on the "pages" may become so dense that they turn into a solid block of thread, losing the definition of individual pages. Conversely, enlarging it too much can leave gaps between stitches, exposing the backing material and ruining the illusion of a clean, white page.
Another overlooked detail is stabilizer selection. Because this design often features a mix of satin stitches (for the cover) and fill stitches (for the pages), using a single type of stabilizer may not yield the best results. A cut-away stabilizer is generally recommended for knit fabrics to prevent distortion, while a tear-away might suffice for stable woven cottons. Using the wrong stabilizer can cause the book shape to warp after washing, making the pages look uneven or twisted. This affects not only the visual appeal but also the longevity of the item.
Additionally, many users fail to utilize the multiple file formats provided. Formats like DST, PES, JEF, and EXP each have slight variations in how they communicate with different machine brands. Choosing the wrong format can lead to color changes being ignored, trim commands being missed, or even needle strikes if the digitizing data is misinterpreted. Always select the format native to your machine brand whenever possible to ensure the highest fidelity to the original digitizer’s intent.
Strategic Application for Better Results
To avoid these pitfalls, start by hooping your fabric correctly. For a design like an open book, centering is crucial. If you plan to add an inspirational quote later, either through embroidery or other means, ensure you leave adequate space within the blank pages. Measure twice, hoop once. Use a water-soluble topping if you are stitching on textured fabrics like towels or corduroy. This prevents the stitches from sinking into the pile, keeping the pages looking crisp and readable.
Consider the thread choice carefully. While standard polyester thread is durable, using a matte cotton thread can give the pages a more authentic, paper-like appearance. For the book cover, a slightly thicker rayon or metallic thread can add depth and contrast, distinguishing the binding from the pages. This subtle differentiation enhances the three-dimensional effect of the embroidery, making the open book with blank pages pop off the fabric.
If you intend to use this design for commercial purposes, such as selling personalized desk accessories, verify the license terms. Most digital embroidery designs come with specific usage rights. Ensure you are compliant with any restrictions on mass production or digital redistribution. This protects your business and respects the intellectual property of the digitizer who created the file.
Enhancing the Design with Personalization
The true power of this design lies in its blank spaces. Rather than leaving the pages empty, consider stitching a meaningful quote, a name, or a date directly onto them. This transforms a generic decoration into a deeply personal artifact. When adding text, choose fonts that complement the style of the book. A serif font often pairs well with the classic look of an open book, while a handwritten script can add a whimsical, journal-like feel. Test your text placement on scrap fabric first to ensure it fits within the boundaries of the pages without overlapping the spine or edges.
You can also experiment with layering. Stitch the open book design onto one piece of fabric, then appliqué it onto a larger background. This adds texture and dimension, making the piece suitable for wall art or quilt blocks. The key is to maintain balance. Do not let the surrounding elements overwhelm the central motif. The open book should remain the focal point, inviting the viewer to imagine what stories might fill its pages.
Final Checks Before You Stitch
Before committing to your final project, run a simulation in your embroidery software if available. This allows you to visualize the stitch order and identify any potential jumps or trims that might need manual adjustment. Check the color sequence to ensure it aligns with your thread palette. Make sure your needle is sharp and appropriate for the fabric weight. A dull needle can cause skipped stitches or pulls, which are particularly noticeable in the fine details of the book’s pages.
Remember, the goal is to create a piece that feels intentional and polished. By paying attention to stabilizer choice, file format compatibility, and thread selection, you elevate the open book with blank pages from a simple download to a standout element in your creative portfolio. Whether for personal enjoyment or professional sale, these small adjustments make a significant difference in the final outcome. Take the time to plan, test, and refine your approach. The result will be a beautifully stitched tribute to the power of words and creativity, ready to inspire anyone who sees it.